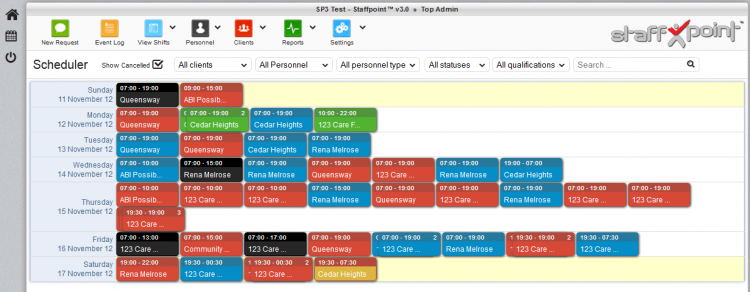
Covering an assignment couldn’t be easier. Navigate to the Scheduler. You’ll see the open assignments as red Assignment Tags. (Note: The information you can see will depend on the permissions your user account has.)
1. Click on an open assignment. The Assignment Summary panel for that assignment will open, and by default, will show you the qualified and available personnel.
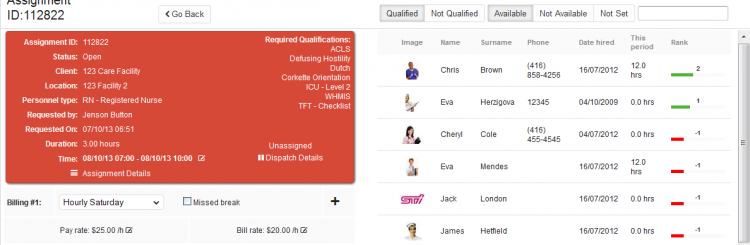
2. If there are no personnel available and qualified, you can click on either of the ‘Qualified’, ‘Not Qualified’, ‘Available’, ‘Unavailable’, or ‘Not Set’ buttons in any combination to view the appropriate personnel. You can also use the search field to the right of these tabs to search the list if there's a specific name you're looking for.
3. Simply mousing-over a personnel’s entry for a second will
slide them into the booking temporarily and show you some basic info
about them on the left, including fields for setting  assignment billing,
notes, and more. Clicking on a personnel will do the same thing. Clicking on that personnel member's name on the left, or their picture thumbnail on the right will lead to their personnel profile. Clicking on their email address on the left side will create a new email addressed to them.
assignment billing,
notes, and more. Clicking on a personnel will do the same thing. Clicking on that personnel member's name on the left, or their picture thumbnail on the right will lead to their personnel profile. Clicking on their email address on the left side will create a new email addressed to them.
4. You can edit the billing figures for this assignment, or if billing is based on job type codes, you can select the appropriate code. Multiple billing types can be assigned by clicking the + button to the right of the lowest billing type (see page Billing Types Management for more info). The 'Missed Break' check box tells the system that this person has not taken a break, and it will bring up a dialog box where you can optionally deduct time from the missed break if they didn't miss the entire break, for example. You can find more info in Creating a Personnel Type.

5. Finally, if the personnel member is suitable, click on the ‘Confirm Assignment’ button, andthe assignment will change colour to blue, which indicates that it’s covered. Notifications will be sent to both client and the personnel member (depending on preferences), notifying them of the booking. 5b. Alternately, if the personnel cannot or does not want to work the shift, you can click on ‘Decline Assignment’. This will remove the personnel member from any lists for this or any identical assignments (same times, hours, location, etc...), so that they can’t be moved back into the pool and be called on again by accident. This will also record it in the ‘Declined Assignments’ report for personnel. This report notes each personnel and the assignments they’ve declined, including the number of assignments, when they declined, and the total hours declined for that time period.